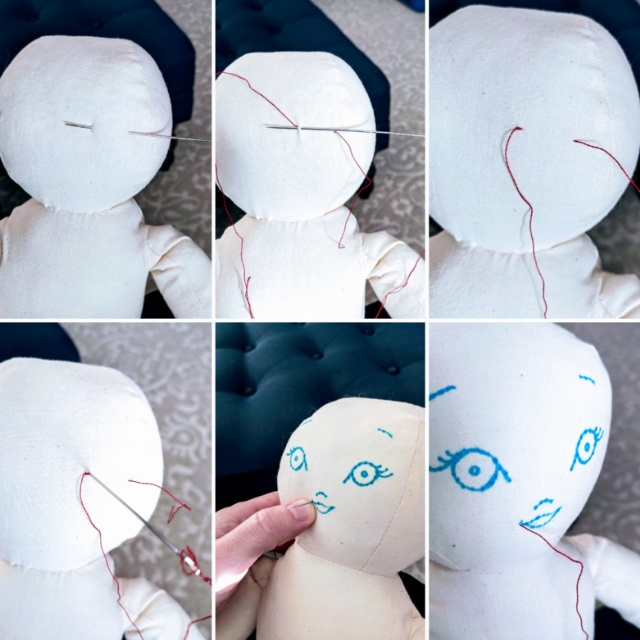
To embroider a face on a premade doll, I use a doll needle, which is about 5″ long. Thread it with a single long strand of embroidery floss. Working on the back or side of the head, insert the needle and pull it out a few inches from the original entry point, leaving a tail of thread sticking out. Create a small stitch to anchor the thread on the back of the head and repeat the tiny stitch. Next, insert the needle through the existing stitch, through the head, and out of the face, exactly where you want to begin stitching. I am beginning with red thread for the lips. Last, cut off the tail on the back of the head, and remove the doll needle and replace it with an embroidery needle.
For the lips, I will be doing a satin stitch, which is a series of semi-vertical stitches very close together. Since I am working with a single thread, I make a lot of stitches to give the exact effect I want.
This process of making an anchor stitch on the back of the head is repeated in reverse when I am finished with the thread. I rethread the doll needle on the face side and insert it back through the head and make more anchor stitches on the back of the head. Then I insert the needle through the anchor stitch and exit a few inches away and cut off the tail of thread at the surface.
The natural light in the house is fleeting these days! I used the 15 minutes of light we got today to take these photos. I hope to have the face finished by Friday. Hopefully, the sun will come out a little more tomorrow so I can show some progress.
I spent time this week picking out her clothing and narrowing down eye and lip color. I already know she will have orange hair. ♥️